
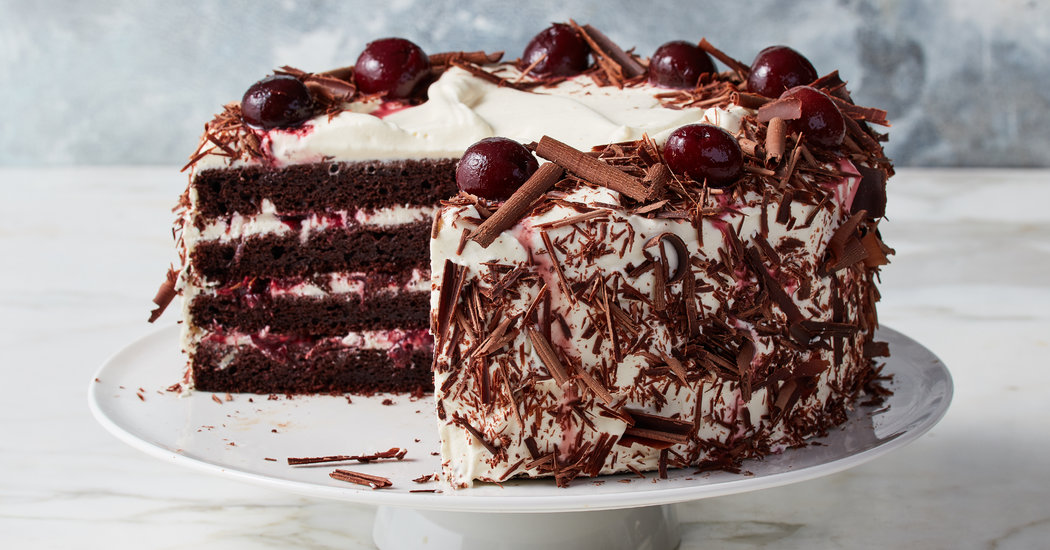
Traditional Black Forest Cake is dramatic, rich, and layered with flavor in a way that few desserts can match. Deep chocolate sponge, clouds of freshly whipped cream, and cherries soaked in syrup come together in a cake that feels both rustic and elegant. I bake this cake when I want something that looks impressive on the table but still feels homemade and heartfelt.
This cake, inspired by the classic German Schwarzwälder Kirschtorte, relies on balance rather than heaviness. The chocolate layers are moist but not overly dense, the whipped cream is lightly sweetened, and the cherries provide brightness that cuts through the richness. If you follow each step carefully and allow time for proper cooling and assembly, you can create a bakery-style Black Forest Cake entirely from your own kitchen.
Everything is laid out clearly so you can move confidently from ingredients to final garnish.
Ingredients For The Chocolate Cake Layers
The cake base is a soft chocolate sponge that absorbs cherry syrup beautifully. I measure everything precisely because sponge cakes depend on structure and balance.
- 2 cups (250 g) all-purpose flour
- 3/4 cup (75 g) unsweetened cocoa powder
- 2 teaspoons baking powder
- 1 1/2 teaspoons baking soda
- 1/2 teaspoon salt
- 1 cup (225 g) unsalted butter, softened
- 1 3/4 cups (350 g) granulated sugar
- 4 large eggs, room temperature
- 2 teaspoons vanilla extract
- 1 cup (240 ml) whole milk, room temperature
- 1/2 cup (120 ml) hot water or hot coffee
Hot coffee deepens the chocolate flavor without making the cake taste like coffee. If preferred, hot water works just as well.
Ingredients For The Cherry Filling
Traditional Black Forest Cake uses sour cherries, but high-quality jarred or canned cherries work beautifully.
- 2 cups (about 400 g) pitted sour cherries, drained (reserve syrup)
- 1/2 cup (120 ml) reserved cherry syrup
- 2 tablespoons granulated sugar
- 1 tablespoon cornstarch
- 1 tablespoon kirsch (optional but traditional)
Kirsch, a cherry brandy, enhances authenticity. If you prefer not to use alcohol, simply omit it.
Ingredients For The Whipped Cream Frosting
Freshly whipped cream gives this cake its signature lightness.
- 3 cups (720 ml) heavy whipping cream, very cold
- 1/3 cup (40 g) powdered sugar
- 2 teaspoons vanilla extract
Garnish
- 1/2 cup chocolate shavings or curls
- Whole cherries with stems for decoration
I prepare all components before assembly so everything is ready to layer smoothly.
Preparing The Cake Pans And Oven
I preheat the oven to 350°F (175°C). I grease and line two 9-inch round cake pans with parchment paper, then lightly flour the sides.
Proper preparation ensures the cakes release cleanly. Chocolate cakes can be delicate when warm, so I handle them gently once baked.
Mixing The Dry Ingredients
In a medium bowl, I whisk together the flour, cocoa powder, baking powder, baking soda, and salt. Whisking evenly distributes the leavening agents and removes lumps from the cocoa powder.
I set this bowl aside while I prepare the butter mixture.
Creaming Butter And Sugar
In a large mixing bowl, I beat the softened butter until smooth. Gradually, I add the sugar and beat for about four minutes until pale and fluffy.
This step creates the base structure for the cake. Proper creaming ensures a tender crumb rather than a dense texture.
Adding Eggs And Vanilla
I add the eggs one at a time, beating well after each addition. Then I mix in the vanilla extract.
The batter should look smooth and creamy at this stage. Scraping down the sides of the bowl ensures everything is evenly incorporated.
Incorporating Dry Ingredients And Liquids
With the mixer on low speed, I add the dry ingredients in three additions, alternating with the milk in two additions. I begin and end with the dry ingredients.
Once combined, I slowly pour in the hot water or coffee and mix until smooth. The batter will appear slightly thin, which is normal for a moist chocolate cake.
Baking The Cake Layers
I divide the batter evenly between the prepared pans and smooth the tops. The cakes bake for 30 to 35 minutes.
I test for doneness with a toothpick inserted into the center. If it comes out clean or with a few moist crumbs, the cakes are ready.
After baking, I allow them to cool in the pans for 10 minutes before transferring to wire racks to cool completely.
Preparing The Cherry Filling
In a small saucepan, I combine the reserved cherry syrup, sugar, and cornstarch. I cook over medium heat, stirring constantly until the mixture thickens.
Once thickened, I remove it from the heat and stir in the cherries and kirsch. I allow the mixture to cool completely before assembling the cake.
The filling should be glossy and thick enough to spread without running.
Making The Whipped Cream Frosting
I chill my mixing bowl and beaters before whipping the cream. Cold equipment helps the cream whip faster and hold its shape.
I beat the heavy cream until it begins to thicken, then add powdered sugar and vanilla extract. I continue beating until stiff peaks form.
The whipped cream should be firm enough to spread but still smooth and silky.
Leveling The Cake Layers
Once the cakes are completely cool, I level the tops if necessary. Flat layers stack more neatly and create a stable structure.
I sometimes slice each cake horizontally to create four thinner layers for a more dramatic presentation, but two thick layers also work beautifully.
Assembling The Black Forest Cake
I place the first cake layer on a serving plate. I brush it lightly with a bit of reserved cherry syrup for added moisture.
Next, I spread a layer of whipped cream evenly over the cake. I spoon half of the cherry filling on top of the cream, spreading it gently without pressing too hard.
I place the second cake layer on top and repeat the process if using multiple layers. Once stacked, I frost the entire cake with whipped cream, smoothing the sides and top carefully.
Decorating The Cake
I press chocolate shavings onto the sides of the cake. To make chocolate curls, I use a vegetable peeler on a bar of chocolate.
I pipe decorative swirls of whipped cream around the top edge and place whole cherries on each swirl. The finished cake should look elegant yet inviting.
Texture And Flavor Profile
Traditional Black Forest Cake is a harmonious blend of flavors and textures. The chocolate cake is moist and rich without being overly sweet. The whipped cream adds lightness, while the cherries provide brightness and slight tartness.
Chocolate shavings add a subtle crunch that contrasts beautifully with the soft layers.
Storage And Serving Tips
Because of the whipped cream, I store the cake in the refrigerator. I cover it loosely to prevent it from absorbing odors.
Before serving, I allow the cake to sit at room temperature for about 20 minutes. This softens the layers slightly and enhances the flavor.
I slice the cake with a long, sharp knife, wiping it clean between cuts for neat presentation.
Troubleshooting Common Issues
If the whipped cream begins to deflate, it may not have been whipped to stiff peaks. Chilling the bowl and cream beforehand helps maintain stability.
If the cherry filling is too runny, it likely needs additional cooking time. It should be thick enough to hold its shape when spooned onto the cake.
If the cake layers crumble, they may not have cooled completely before slicing.
Final Thoughts
Traditional Black Forest Cake at home feels both impressive and comforting. The layers of chocolate, cream, and cherries create a dessert that looks festive and tastes balanced. Each bite offers richness, freshness, and just enough sweetness.
Making this cake from scratch requires attention to detail, but the result is worth the effort. Once assembled and decorated, it becomes the centerpiece of any celebration. With careful preparation and patience, you can bring the timeless elegance of Black Forest Cake straight to your own table.