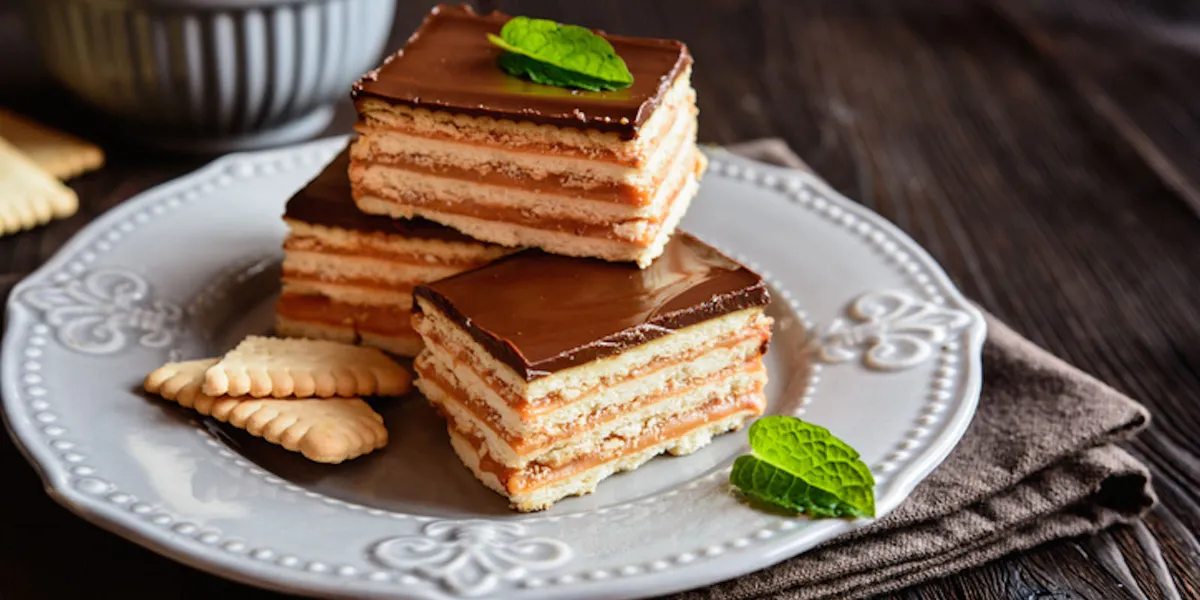
No-Bake Biscuit Chocolate Cake
No-Bake Biscuit Chocolate Cake is one of those desserts I turn to when I want something rich, nostalgic, and effortless all at once. It delivers deep chocolate flavor, a satisfying crunch from the biscuits, and a fudgy texture that firms up beautifully in the fridge. I love that it requires no oven time, no complicated techniques, and no special equipment beyond a saucepan and a mixing bowl. With just a bit of patience while it chills, the result slices cleanly and tastes like a cross between a chocolate truffle and a classic cake.
This recipe is completely practical and reliable. I have made it for family gatherings, casual dinners, and quiet weekends when I simply want a sweet treat ready in advance. If you follow the measurements and steps carefully, you will have a firm, glossy chocolate cake packed with biscuit pieces in perfect layers. The instructions below are detailed so you can read, prepare, chill, and serve without guessing.
Ingredients You Will Need
I always measure everything before starting because once the chocolate mixture is warm, the process moves quickly. Precise amounts help the cake set properly and slice cleanly.
300 grams plain tea biscuits or digestive biscuits
200 grams dark chocolate, chopped
100 grams milk chocolate, chopped
120 grams unsalted butter
200 milliliters heavy cream
3 tablespoons unsweetened cocoa powder
4 tablespoons powdered sugar
1 teaspoon pure vanilla extract
A pinch of salt
Optional additions:
1/2 cup chopped nuts such as walnuts or hazelnuts
1/2 cup raisins or dried cranberries
2 tablespoons chocolate chips
The combination of dark and milk chocolate creates a balanced flavor. Dark chocolate provides depth and slight bitterness, while milk chocolate softens the intensity and adds creaminess. The butter and cream form the base of the ganache-like mixture that binds everything together.
Preparing The Biscuits
I start by breaking the biscuits into pieces. I do not crush them into fine crumbs because the charm of this cake lies in the visible chunks. I usually break each biscuit into four to six pieces, depending on size, so that they remain substantial and create a mosaic pattern when sliced.
I place the broken biscuits into a large mixing bowl. If I am adding nuts or dried fruit, I mix them in at this stage so they distribute evenly. The dry mixture should look abundant and textured, with different shapes and sizes visible throughout.
Making The Chocolate Base
The chocolate base is what transforms simple biscuits into a rich, sliceable cake. I use a medium saucepan and set it over low heat to avoid scorching the chocolate.
First, I add the butter and allow it to melt slowly. Once melted, I pour in the heavy cream and stir gently. I let the mixture warm until it is hot but not boiling, as excessive heat can cause the chocolate to seize.
Next, I remove the saucepan from the heat and add the chopped dark and milk chocolate. I let it sit for a minute so the residual heat softens the chocolate. Then I stir slowly with a spatula until the mixture becomes smooth and glossy.
After the chocolate has fully melted, I sift in the cocoa powder and powdered sugar. Sifting prevents lumps and ensures a silky texture. I add the pinch of salt and vanilla extract, stirring until everything is fully incorporated. The result should be thick, shiny, and deeply aromatic.
Combining Everything Together
With the chocolate mixture ready, I immediately pour it over the bowl of broken biscuits. I use a sturdy spatula to fold everything together. It is important to coat every piece of biscuit thoroughly so the cake sets evenly.
The mixture will look thick and slightly sticky. I continue folding until no dry biscuit surfaces remain visible. If I notice any pockets that seem undercoated, I gently press them down and mix again to ensure even distribution.
At this stage, the mixture should hold together when pressed. If it feels too dry, I add one or two tablespoons of warm milk and mix again. This adjustment depends on the type of biscuits used, as some absorb more moisture than others.
Shaping The Cake
I prefer using a 20-centimeter round cake pan with a removable base, but a loaf tin also works beautifully. I line the pan with parchment paper, leaving some overhang to make removal easier later.
I transfer the chocolate biscuit mixture into the prepared pan. Using the back of a spoon or an offset spatula, I press it down firmly. Compacting the mixture is crucial because it helps the cake hold its shape after chilling.
I smooth the top carefully, making sure the surface is level. Pressing firmly eliminates air gaps and ensures neat slices later. Once shaped, I cover the pan with plastic wrap.
Chilling Time
Refrigeration is what transforms the soft mixture into a firm, sliceable cake. I place the pan in the refrigerator for at least four hours, though overnight chilling gives the best texture.
As it chills, the butter and chocolate solidify, binding the biscuits together. The cake becomes dense yet tender, with each biscuit piece embedded in rich chocolate. Patience during this step ensures clean cuts and a satisfying bite.
Optional Chocolate Ganache Topping
For an extra layer of indulgence, I sometimes add a ganache topping. It creates a smooth, glossy finish and intensifies the chocolate flavor.
To make the topping, I heat 100 milliliters of heavy cream until hot but not boiling. I pour it over 100 grams of chopped dark chocolate and let it sit briefly. Then I stir until smooth and shiny.
Once the cake has chilled and set, I pour the ganache over the top and spread it evenly. I return the cake to the refrigerator for another 30 to 60 minutes to allow the topping to firm up.
Unmolding And Slicing
When ready to serve, I remove the cake from the refrigerator and let it sit at room temperature for about 10 minutes. This slight warming makes slicing easier and enhances the flavor.
I gently lift the cake out using the parchment overhang. With a sharp knife, I cut clean slices, wiping the blade between cuts for a neat presentation. The cross-section reveals beautiful layers of chocolate-coated biscuit pieces.
The texture is firm but not hard. Each bite combines crunch, chewiness, and smooth chocolate. The contrast between the biscuits and the rich binding mixture creates a balanced and satisfying dessert.
Flavor Variations
This recipe serves as a versatile base for countless variations. I sometimes add a tablespoon of instant espresso powder to the chocolate mixture for a deeper flavor. It does not taste like coffee, but it enhances the chocolate intensity.
For a festive version, I mix in chopped dried apricots and pistachios. The bright colors look beautiful against the dark chocolate background. A splash of orange zest also adds freshness and complexity.
If I want a lighter flavor, I replace part of the dark chocolate with white chocolate and reduce the sugar slightly. The result is sweeter and creamier, with a softer color and milder taste.
Storage Tips
No-Bake Biscuit Chocolate Cake stores very well in the refrigerator. I keep it in an airtight container for up to five days. The flavor actually improves slightly after the first day as the biscuits soften just enough while still retaining structure.
For longer storage, I wrap slices individually in plastic wrap and freeze them. When I want a piece, I let it thaw in the refrigerator for a few hours. The texture remains consistent, and the chocolate retains its richness.
Serving Suggestions
I often serve this cake on its own because it is already rich and flavorful. A simple dusting of cocoa powder or powdered sugar adds elegance without overpowering the taste.
For a more elaborate presentation, I add fresh berries on the side. Their slight acidity balances the sweetness of the chocolate. A dollop of lightly whipped cream also complements the dense texture beautifully.
If serving at a dinner gathering, I drizzle a thin line of warm chocolate sauce across each plate before placing a slice on top. This small detail elevates the dessert visually and adds extra indulgence.
Common Mistakes To Avoid
Using low-quality chocolate can significantly affect flavor. I always choose chocolate with good cocoa content because it forms the foundation of the cake. Poor-quality chocolate can taste overly sweet or waxy.
Insufficient pressing during shaping can cause the cake to crumble when sliced. Firm pressure ensures compact structure. I take my time during this step to guarantee clean slices later.
Skipping the chilling time is another common issue. The cake must fully set before cutting. Cutting too early results in a soft, messy texture rather than defined slices.
Why This Recipe Works
The balance of fat from butter and cream allows the chocolate to solidify smoothly. As the cake chills, the cocoa butter in the chocolate firms up and binds the biscuits securely.
The biscuit pieces provide structure and prevent the cake from becoming overly dense. Their slight crunch contrasts beautifully with the smooth chocolate matrix. Each component plays a role in achieving the final texture.
The combination of dark and milk chocolate keeps the flavor complex yet approachable. The salt enhances sweetness and deepens the overall profile without being noticeable.
Making It Dairy-Free
I sometimes adapt this cake for dairy-free needs. I substitute the butter with a plant-based alternative and use coconut cream instead of heavy cream. The chocolate must also be dairy-free.
The texture remains firm and sliceable as long as the fat content stays similar. Coconut cream adds a subtle flavor, which pairs nicely with dark chocolate. The overall structure remains intact.
Final Thoughts
No-Bake Biscuit Chocolate Cake is one of the most reliable desserts I make. It requires minimal effort, no oven, and simple ingredients, yet the result looks impressive and tastes deeply satisfying. The combination of crunchy biscuits and smooth chocolate creates a texture that feels both nostalgic and luxurious.
By following the steps carefully, pressing the mixture firmly, and allowing proper chilling time, you will achieve a beautifully set cake that slices cleanly and delights with every bite. This recipe proves that incredible chocolate desserts do not always require baking. With patience and good ingredients, you can create a rich, elegant cake entirely in your refrigerator.