
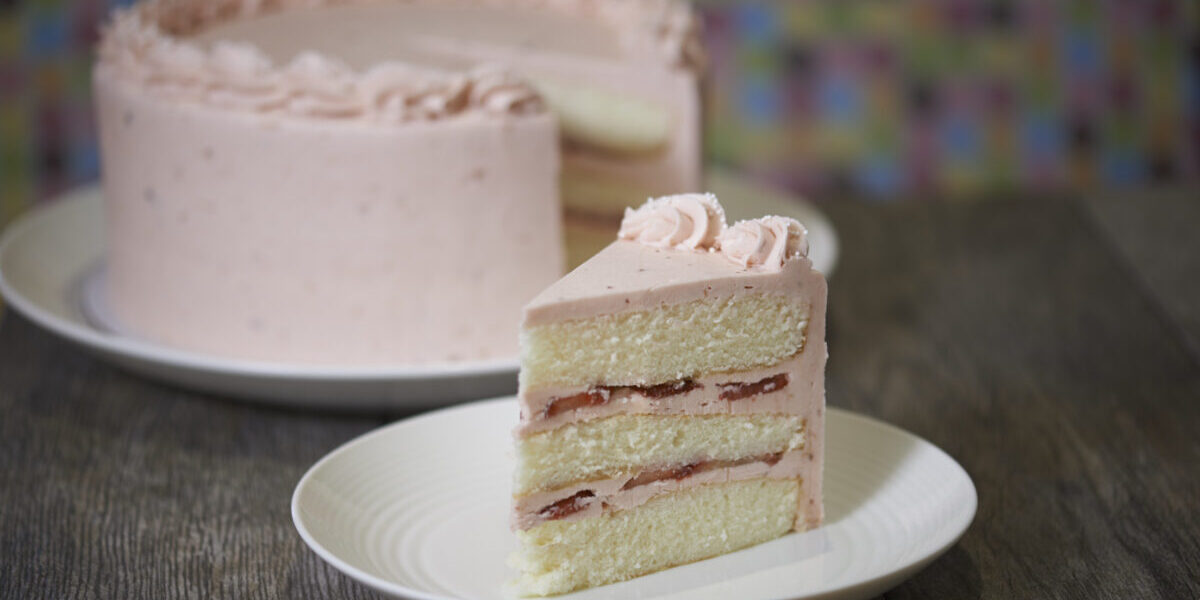
Fresh strawberries and soft vanilla cake belong together, and this Fresh Strawberry Shortcake Layer Cake proves it in the most delicious way. I make this cake when strawberries are at their peak, bright red and fragrant, because the flavor truly carries the entire dessert. Each layer is tender and buttery, filled with juicy macerated berries and clouds of freshly whipped cream. The result tastes like classic strawberry shortcake, but dressed up as a beautiful layer cake that you can slice and serve for birthdays, gatherings, or simply because strawberries looked too good to pass up.
This recipe is detailed so you can follow it step by step and confidently bake the cake from scratch. I will walk you through preparing the cake layers, sweetening the strawberries, whipping the cream, and assembling everything into a tall, impressive centerpiece. If you measure carefully and give yourself enough time for cooling and chilling, you will end up with a bakery-worthy cake made entirely in your own kitchen.
Ingredients For The Vanilla Cake Layers
For the cake batter, gather the following ingredients:
3 cups (360 g) all-purpose flour
2 1/2 teaspoons baking powder
1/2 teaspoon baking soda
1/2 teaspoon fine salt
1 cup (226 g) unsalted butter, room temperature
1 3/4 cups (350 g) granulated sugar
4 large eggs, room temperature
1 tablespoon pure vanilla extract
1 cup (240 ml) whole milk, room temperature
1/2 cup (120 ml) sour cream, room temperature
These ingredients create a soft, tender crumb that supports the juicy strawberries and whipped cream without becoming soggy. The combination of milk and sour cream keeps the cake moist and slightly rich, which balances the freshness of the fruit. Room-temperature ingredients blend more smoothly and help create an even batter.
Ingredients For The Strawberry Filling
For the strawberry layer, you will need:
1 1/2 pounds (about 680 g) fresh strawberries
1/3 cup (65 g) granulated sugar
1 teaspoon fresh lemon juice
The strawberries are lightly macerated with sugar and a touch of lemon juice. This process draws out their natural juices, intensifies the flavor, and creates a glossy syrup that soaks gently into the cake layers. I always taste a small piece before adding sugar because very sweet berries may need slightly less.
Ingredients For The Whipped Cream Frosting
For the stabilized whipped cream frosting, gather:
2 1/2 cups (600 ml) cold heavy whipping cream
3/4 cup (90 g) powdered sugar
1 tablespoon pure vanilla extract
1 tablespoon cornstarch
The cornstarch helps stabilize the whipped cream slightly, so it holds its shape longer, especially if the cake needs to sit out for a short while. The powdered sugar sweetens the cream without leaving any graininess, and the vanilla ties everything together with warmth.
Preparing The Cake Pans And Oven
I begin by preheating my oven to 350°F (175°C). Proper oven temperature is essential for even baking, so I let it fully preheat before placing any cake inside. While the oven heats, I prepare three 8-inch round cake pans.
I lightly grease each pan with butter, line the bottoms with parchment paper circles, and then dust the sides with a bit of flour. This step ensures the cakes release cleanly after baking. Skipping the parchment can lead to sticking, which risks tearing the delicate layers and making assembly more difficult.
Mixing The Dry Ingredients
In a medium bowl, I whisk together the flour, baking powder, baking soda, and salt. Whisking evenly distributes the leavening agents so the cake rises uniformly in the oven. It also aerates the flour slightly, helping create a lighter crumb.
I set this bowl aside while I work on the butter and sugar mixture. Keeping dry and wet ingredients separate at first prevents overmixing later, which can make the cake dense instead of soft.
Creaming The Butter And Sugar
In a large mixing bowl, I beat the room-temperature butter on medium speed until smooth and creamy. This takes about one to two minutes, depending on how soft the butter is. I then gradually add the granulated sugar and continue beating for about three to four minutes, until the mixture becomes pale and fluffy.
This creaming step is crucial because it incorporates air into the batter. The tiny air pockets expand in the oven, contributing to a soft, tender texture. I scrape down the sides of the bowl at least once to make sure everything mixes evenly and no butter remains stuck to the bottom.
Adding The Eggs And Vanilla
I add the eggs one at a time, beating well after each addition. This prevents the batter from curdling and helps maintain a smooth consistency throughout. After the eggs are fully incorporated, I mix in the vanilla extract.
The batter should look glossy and slightly thick at this stage. If it appears separated, I scrape the bowl and mix gently until smooth again. Taking a few extra seconds here makes a noticeable difference in the final texture of the cake.
Combining Wet And Dry Ingredients
I reduce the mixer speed to low and add the dry ingredients in three additions, alternating with the milk and sour cream. I begin and end with the dry ingredients to keep the batter balanced. After each addition, I mix just until incorporated.
Overmixing at this stage can develop too much gluten in the flour, which leads to a tougher cake. I stop the mixer as soon as no streaks of flour remain. Then I give the batter a final gentle fold with a spatula to ensure everything at the bottom of the bowl is fully combined.
Baking The Cake Layers
I divide the batter evenly among the three prepared pans, smoothing the tops with a spatula. To ensure even layers, I sometimes weigh each pan on a kitchen scale. Equal layers stack more neatly and look more professional once assembled.
The cakes bake for about 22 to 28 minutes, or until a toothpick inserted into the center comes out clean or with just a few moist crumbs. I rotate the pans halfway through baking if my oven has hot spots. Once done, I let the cakes cool in their pans for about 10 minutes before turning them out onto wire racks to cool completely.
Preparing The Strawberries
While the cakes cool, I prepare the strawberry filling. I rinse the strawberries gently under cold water and pat them completely dry. Excess moisture can dilute the flavor and make the filling watery.
I hull the strawberries and slice them into thin, even pieces. In a large bowl, I toss the sliced strawberries with the granulated sugar and lemon juice. After about 20 to 30 minutes, the berries release their juices and become glossy and fragrant. I stir them occasionally to distribute the syrup evenly.
Making The Whipped Cream Frosting
Cold cream whips better, so I place my mixing bowl and beaters in the refrigerator for about 10 minutes before starting. I pour the cold heavy cream into the chilled bowl and begin beating on medium speed. Once it thickens slightly, I add the powdered sugar, vanilla extract, and cornstarch.
I continue beating until medium to stiff peaks form. The cream should hold its shape when I lift the beaters, but it should still look smooth and soft rather than grainy. Overwhipping can turn it into butter, so I watch it closely near the end.
Leveling And Preparing The Cake Layers
If the cake layers have domed tops, I use a serrated knife to level them gently. Flat layers stack more securely and prevent the cake from leaning. I brush away any loose crumbs before assembly.
At this point, I make sure the cakes are completely cool. Warm cake will melt the whipped cream and create a messy structure. Patience here makes the final result much cleaner and more stable.
Assembling The Cake
I place the first cake layer on a serving plate or cake stand. I spread a generous layer of whipped cream over the top, then spoon a portion of the macerated strawberries evenly across the cream. I make sure to include some of the syrup, but not so much that it floods the layer.
I repeat the process with the second layer, spreading whipped cream and adding more strawberries. Finally, I place the third cake layer on top, pressing down gently to secure everything without squeezing out the filling.
Frosting The Outside
I cover the entire cake with a layer of whipped cream, using an offset spatula to smooth the sides and top. For a rustic look, I leave soft swirls and texture in the cream. For a cleaner finish, I run a bench scraper around the sides while rotating the cake stand.
I decorate the top with additional fresh strawberries, either halved or arranged in a circular pattern. Sometimes I add a few whole berries with their tops still attached for a natural, vibrant appearance.
Chilling And Serving
Once assembled, I refrigerate the cake for at least one hour before slicing. This helps the whipped cream firm up slightly and allows the flavors to meld together. The strawberry juices soak gently into the cake layers, making each bite moist and flavorful.
To slice cleanly, I use a sharp knife and wipe it clean between cuts. Each slice reveals distinct layers of vanilla cake, cream, and bright red strawberries. The contrast between the soft cake and the juicy fruit makes every bite refreshing and satisfying.
Storage Tips
This cake is best enjoyed the same day it is assembled, but it can be stored in the refrigerator for up to two days. I keep it covered loosely to prevent it from absorbing refrigerator odors. The whipped cream remains stable, though the strawberries may release a bit more juice over time.
If you want to prepare in advance, you can bake the cake layers one day ahead and store them tightly wrapped at room temperature. The strawberries and whipped cream should be prepared closer to serving time for the freshest flavor and texture.
Final Thoughts
Fresh Strawberry Shortcake Layer Cake captures everything I love about summer baking in one beautiful dessert. The tender vanilla layers, lightly sweetened strawberries, and airy whipped cream come together in a way that feels both comforting and celebratory. Each step is simple on its own, and when combined, they create a cake that looks impressive but is completely achievable at home.
I return to this recipe whenever strawberries are in season because it never disappoints. The flavors are clean and bright, and the texture stays soft and delicate from the first slice to the last. If you follow the steps carefully and give the cake time to chill, you will have a stunning dessert that tastes just as good as it looks.