
No-Oven Banana Cake Recipe is my reliable solution when ripe bananas are sitting on the counter and I do not want to turn on the oven. With a heavy pot, a stovetop setup, or even a basic cooker, I can bake a soft, moist banana cake that fills the kitchen with warm aroma. The texture turns out tender and slightly dense in the best way, packed with natural sweetness from ripe bananas.
I love how this method transforms simple ingredients into something comforting and homemade. The bananas do most of the flavor work, which means the ingredient list stays short and practical. With careful mixing and gentle heat, the result is a cake that slices beautifully and tastes even better the next day.
This cake works as a snack, breakfast treat, or casual dessert. It does not require fancy equipment, and the steps are straightforward enough for anyone to follow confidently.
Ingredients You Will Need
I always measure everything before I start because banana cakes depend on balance. Too much banana can make the cake heavy, and too little can reduce flavor.
1 1/2 cups all-purpose flour
3/4 cup granulated sugar
1/4 cup brown sugar
1 teaspoon baking powder
1/2 teaspoon baking soda
1/4 teaspoon salt
2 medium very ripe bananas, mashed well
2 large eggs, at room temperature
1/2 cup vegetable oil
1/4 cup plain yogurt or milk
1 teaspoon vanilla extract
1/2 teaspoon cinnamon (optional)
Optional add-ins:
1/2 cup chopped walnuts
1/3 cup chocolate chips
Ripe bananas are key to sweetness and moisture. Oil keeps the crumb soft, while yogurt adds tenderness. Baking powder and baking soda help the cake rise even in a covered pot environment.
Preparing The No-Oven Setup
I use a heavy-bottomed pot or deep pan with a tight-fitting lid. To create an oven-like effect, I spread a thick layer of salt or sand at the bottom of the pot.
Next, I place a metal stand or trivet over the salt layer. This prevents direct heat from burning the cake pan.
I preheat the covered pot on low to medium-low heat for about 8 to 10 minutes. Preheating ensures the cake begins baking immediately once placed inside.
Preparing The Cake Pan
While the pot heats, I grease a 7-inch round cake pan with oil or butter. I line the bottom with parchment paper for easy removal.
The pan should fit inside the pot without touching the sides. Space around the pan allows heat to circulate evenly.
Mixing The Dry Ingredients
In a large bowl, I whisk together flour, baking powder, baking soda, salt, and cinnamon if using. Even mixing at this stage ensures consistent rise.
Breaking up any flour lumps now prevents dense spots in the finished cake.
Combining The Wet Ingredients
In another bowl, I mash the bananas until smooth. A few small lumps are fine, but I avoid large chunks.
I add the eggs, granulated sugar, brown sugar, oil, yogurt, and vanilla extract. I whisk until the mixture becomes smooth and slightly creamy.
The bananas blend with the sugar to create a fragrant, slightly thick mixture.
Bringing The Batter Together
I gradually add the dry ingredients to the wet mixture. Using a spatula, I fold gently until just combined.
Overmixing can make the cake tough, so I stop once no visible flour streaks remain. The batter should be thick but pourable.
If I am adding walnuts or chocolate chips, I fold them in at this stage.
Pouring The Batter Into The Pan
I pour the batter into the prepared pan and smooth the top evenly. Tapping the pan lightly on the counter removes trapped air bubbles.
A level surface helps the cake bake evenly without doming excessively.
Baking The Cake Without An Oven
Using heatproof gloves or tongs, I carefully place the cake pan on the trivet inside the preheated pot. I cover the pot tightly with its lid.
I bake the cake on low heat for 35 to 50 minutes. Cooking time depends on pot thickness and heat intensity.
After 35 minutes, I check by inserting a toothpick into the center. If it comes out clean or with dry crumbs, the cake is ready. If it shows wet batter, I continue baking and check every 5 to 7 minutes.
Maintaining low heat is essential. High heat can burn the bottom while leaving the center undercooked.
Cooling The Banana Cake
Once baked, I turn off the heat and let the cake rest in the covered pot for about 5 minutes. Then I remove the pan and place it on a cooling rack.
I allow it to cool in the pan for 10 to 15 minutes before running a knife around the edges and inverting it onto a plate. After peeling off the parchment paper, I let it cool completely.
Cooling allows the crumb to firm up and makes slicing easier.
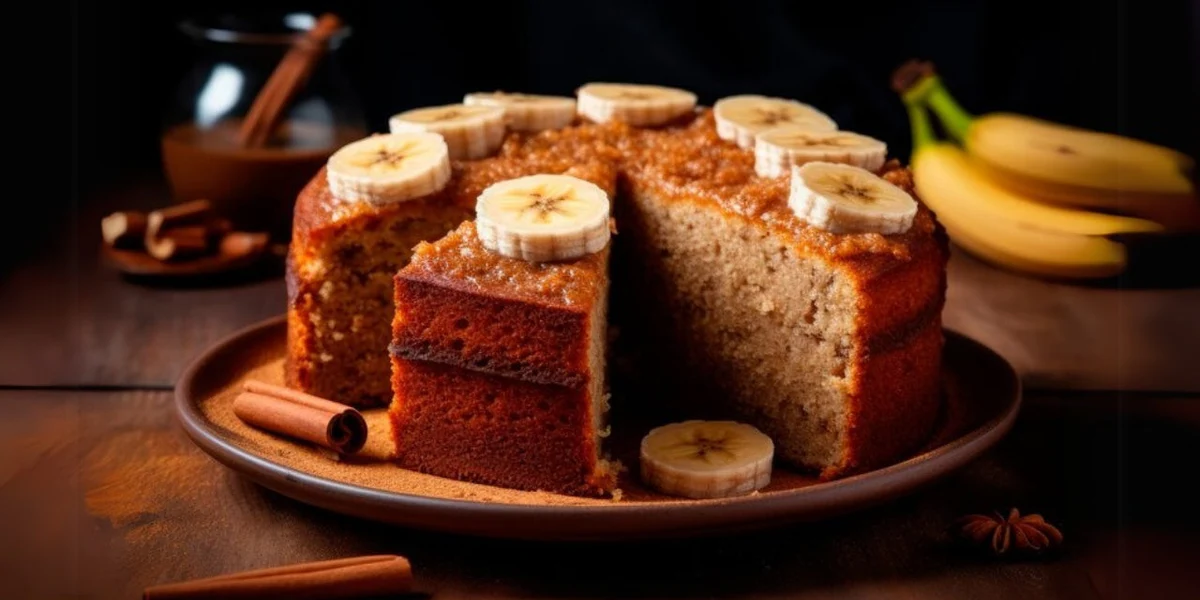
Texture And Flavor Profile
No-Oven Banana Cake has a moist, tender crumb with natural sweetness from ripe bananas. The texture is soft yet slightly dense, similar to a traditional banana bread but lighter.
The aroma is warm and comforting, especially if cinnamon is included. Nuts add crunch, while chocolate chips create pockets of melted richness.
The bottom develops a subtle golden crust from contact with the heated pan.
Simple Cream Cheese Frosting Option
For a richer dessert, I sometimes prepare a quick cream cheese frosting. I mix softened cream cheese with powdered sugar and a splash of vanilla until smooth.
Spreading it over the cooled banana cake adds tangy sweetness that balances the banana flavor. A sprinkle of chopped nuts on top adds texture.
Turning It Into A Layer Cake
If I want something more festive, I double the recipe and bake two layers separately. After cooling, I spread frosting between the layers.
Banana slices between layers add extra flavor and visual appeal. A light caramel drizzle can elevate the presentation.
Flavor Variations
Adding shredded coconut gives the cake a tropical note. A tablespoon of cocoa powder mixed into part of the batter creates a marbled banana-chocolate effect.
Replacing vanilla with a few drops of almond extract adds subtle depth. Even small changes can refresh the flavor profile.
Common Mistakes To Avoid
Using bananas that are not ripe enough reduces sweetness and moisture. The peel should be heavily speckled or dark for best results.
High heat can cause uneven cooking. Gentle, steady heat ensures proper baking.
Opening the lid too often releases heat and extends cooking time. I check only when necessary.
Storage And Shelf Life
Once cooled completely, I store the cake in an airtight container at room temperature for up to two days. Because of the banana content, refrigeration extends freshness to about five days.
Before serving refrigerated slices, I allow them to sit at room temperature for 20 minutes. This restores softness and enhances flavor.
The cake freezes well if wrapped tightly in plastic wrap and stored in a freezer-safe bag. I thaw slices at room temperature before serving.
Serving Suggestions
I enjoy serving this banana cake slightly warm with a cup of tea or coffee. The flavors feel comforting and homey.
Fresh banana slices and a light dusting of powdered sugar create a simple presentation. For extra indulgence, I serve it with a scoop of vanilla ice cream.
The cake also works well as a lunchbox treat or casual snack. Its moist texture holds up beautifully even the next day.
Why This Method Works
The salt or sand layer distributes heat evenly inside the pot. The trivet prevents direct contact with the base, reducing the risk of burning.
The covered pot traps heat and mimics oven baking conditions. Balanced leavening agents ensure the cake rises properly despite the enclosed environment.
Gentle heat allows the batter to cook through evenly from center to edges.
Final Thoughts
No-Oven Banana Cake Recipe proves that baking does not require a traditional oven. With simple equipment and careful heat control, you can create a moist, flavorful banana cake right on the stovetop.
By following each step carefully and maintaining steady low heat, you will achieve a tender crumb and rich banana flavor. This method is practical, comforting, and perfect for turning ripe bananas into something truly satisfying.