Bakery-Style Chocolate Truffle Cake At Home
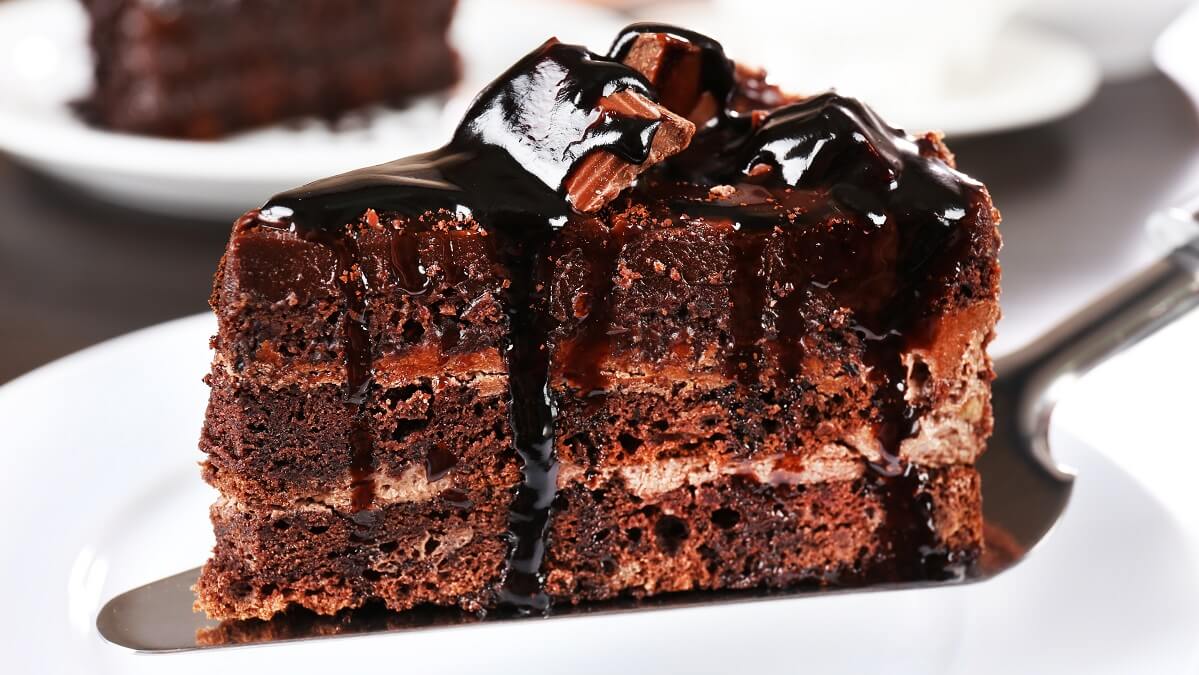
Rich, glossy, and deeply chocolatey, a true chocolate truffle cake feels like something you would admire behind a glass display in a high-end bakery. The smooth ganache finish, the dense yet tender crumb, and the way each slice melts slowly on the tongue make it unforgettable. Making a Bakery-Style Chocolate Truffle Cake at Home is absolutely possible, and I will walk you through each step so you can recreate that indulgent experience in your own kitchen.
This is a complete, practical recipe with clear measurements and detailed instructions. If you follow along carefully, you will end up with a tall, elegant cake layered with silky chocolate truffle filling and wrapped in a glossy ganache coating. The texture is moist and slightly fudgy, while the truffle cream adds a luxurious finish that feels professionally crafted.
Ingredients You Will Need
Before I begin baking, I measure and prepare everything so the process flows smoothly. Precision matters in chocolate cakes because the balance between fat, sugar, and cocoa determines texture and flavor. Room temperature ingredients also help the batter mix evenly and rise properly.
For The Chocolate Cake Layers:
2 cups all purpose flour
3/4 cup unsweetened cocoa powder
2 cups granulated sugar
1 1/2 teaspoons baking powder
1 1/2 teaspoons baking soda
1 teaspoon salt
2 large eggs, room temperature
1 cup whole milk, room temperature
1/2 cup vegetable oil
2 teaspoons pure vanilla extract
1 cup hot brewed coffee
For The Chocolate Truffle Filling:
1 1/2 cups heavy cream
2 cups semi sweet chocolate, finely chopped or chips
2 tablespoons unsalted butter
For The Chocolate Ganache Coating:
1 cup heavy cream
1 1/2 cups semi sweet chocolate chips
Optional Decoration:
Chocolate curls
Cocoa powder for dusting
Fresh berries
Preparing The Cake Pans And Oven
I preheat the oven to 350°F or 175°C so it reaches the correct temperature before the batter goes in. Even heat ensures proper structure and prevents sinking in the center. While the oven warms, I grease two 9-inch round cake pans and line the bottoms with parchment paper.
A light dusting of cocoa powder inside the pans prevents sticking without leaving white marks on the cake’s surface. I tap out any excess cocoa and set the pans aside. Taking a few minutes to prepare properly makes the release process effortless later.
Mixing The Chocolate Cake Batter
In a large mixing bowl, I whisk together the flour, cocoa powder, sugar, baking powder, baking soda, and salt. Whisking aerates the mixture and removes lumps from the cocoa powder. This step ensures the leavening agents are evenly distributed.
In another bowl, I lightly beat the eggs and add the milk, vegetable oil, and vanilla extract. I whisk until smooth and slightly creamy. Blending the wet ingredients separately helps create a uniform batter.
I gradually pour the wet mixture into the bowl of dry ingredients while mixing on medium speed. The batter starts thick, but that is expected at this stage. I scrape down the sides of the bowl to make sure everything incorporates evenly.
Next, I slowly pour in the hot brewed coffee while mixing on low speed. The heat intensifies the cocoa flavor and gives the cake a deeper chocolate taste. The batter becomes thinner and glossy, which is exactly how it should look.
Baking The Cake Layers
I divide the batter evenly between the prepared pans. A kitchen scale helps me keep the layers even, but careful eyeballing works too. I gently tap the pans on the counter to release trapped air bubbles.
The cakes bake for about 30 to 35 minutes. I begin checking around 30 minutes by inserting a toothpick into the center. If it comes out with a few moist crumbs but no wet batter, the cakes are ready.
After removing them from the oven, I let the cakes cool in their pans for 10 minutes. Then I run a knife around the edges and invert them onto a wire rack. The cakes must cool completely before assembling, otherwise the filling and ganache will melt.
Preparing The Chocolate Truffle Filling
While the cake layers cool, I prepare the truffle filling. I heat the heavy cream in a saucepan over medium heat until it just begins to simmer. I do not let it boil because overheating can affect the chocolate’s texture.
I pour the hot cream over the chopped chocolate in a heatproof bowl and let it sit undisturbed for about five minutes. This resting time allows the chocolate to melt gently. Afterward, I stir slowly from the center outward until the mixture becomes smooth and glossy.
I add the butter and stir until fully melted and incorporated. The butter adds shine and a silky texture to the truffle filling. I let the mixture cool at room temperature until it thickens to a spreadable consistency, which usually takes about one to two hours.
If I need to speed up the process, I place the bowl in the refrigerator and stir every 15 minutes to prevent it from becoming too firm. The final texture should resemble thick chocolate frosting.
Leveling And Layering The Cake
Once the cake layers are fully cool, I use a serrated knife to level any domed tops. A flat surface makes stacking easier and creates a professional finish. I place the first layer on a cake stand or serving plate.
I spread a generous layer of the chocolate truffle filling over the first cake layer. The filling should be thick enough to hold its shape but soft enough to spread smoothly. I push it gently toward the edges without letting it spill over.
Then I place the second cake layer on top and press lightly to secure it. If any filling peeks out from the sides, I smooth it gently with a spatula. At this point, the cake already looks impressive, but the ganache coating transforms it completely.
Applying A Thin Crumb Coat
Before pouring the final ganache, I sometimes apply a very thin layer of truffle filling around the sides as a crumb coat. This step traps loose crumbs and creates a smooth surface. I refrigerate the cake for about 20 minutes to firm it up.
Chilling the cake stabilizes the filling and prevents sliding during the final coating. Skipping this step can make the ganache harder to control. A little patience here pays off in the final appearance.
Making The Chocolate Ganache Coating
For the ganache coating, I heat one cup of heavy cream until it just begins to simmer. I pour it over the chocolate chips in a bowl and let it sit for several minutes. Then I stir gently until the mixture becomes silky and smooth.
The ganache should be fluid but not too thin. If it is too hot, it will run off the cake too quickly. I let it cool slightly until it thickens to a pourable consistency.
Coating The Cake With Ganache
I place the cake on a wire rack over a baking sheet to catch excess ganache. Starting from the center, I pour the ganache slowly over the top of the cake. I use an offset spatula to guide it gently toward the edges.
The ganache flows down the sides naturally, creating a smooth finish. If any spots need extra coverage, I spoon a little more ganache over them. I allow the excess to drip off before transferring the cake to a serving plate.
The surface becomes glossy as it sets, giving the cake that bakery display case appearance. I let it rest at room temperature until the ganache firms up slightly but remains soft when sliced.
Decorating For A Professional Look
To give the cake an elegant touch, I sometimes add chocolate curls on top. I make these by running a vegetable peeler along the edge of a chocolate bar. A light dusting of cocoa powder also adds visual depth.
Fresh berries can provide contrast and a hint of tartness that balances the richness. I arrange them gently on top just before serving. Decoration is optional, but it elevates the presentation beautifully.
Slicing And Serving
For clean slices, I dip a sharp knife into hot water and wipe it dry before each cut. This prevents the ganache from sticking and creates smooth edges. Each slice reveals the moist chocolate cake and thick truffle center.
The texture is dense yet tender, almost like a cross between cake and fudge. The truffle filling melts slowly on the tongue, and the ganache coating adds a smooth finish. It feels luxurious without being overly heavy.
Storage And Make Ahead Tips
If I plan ahead, I bake the cake layers a day in advance and wrap them tightly in plastic wrap once cooled. They stay moist and are easier to assemble the next day. The truffle filling can also be made ahead and stored in the refrigerator.
The assembled cake keeps well in the refrigerator for up to four days. I store it in a cake container to protect the glossy finish. Before serving, I let it sit at room temperature for about 30 minutes so the ganache softens slightly.
Freezing is also an option for unfrosted cake layers. I wrap them securely in plastic wrap and foil before freezing. They thaw overnight in the refrigerator and taste just as fresh once assembled.
Troubleshooting Common Problems
If the cake feels dry, it may have been overbaked. Always check a few minutes before the recommended time. Oven temperatures can vary, so an oven thermometer helps maintain accuracy.
If the ganache looks grainy, the chocolate may have overheated. Stirring gently and avoiding boiling cream prevents this issue. Using good quality chocolate also improves texture and flavor significantly.
If the truffle filling becomes too firm, I let it sit at room temperature until it softens. Stirring occasionally helps restore a smooth consistency. Paying attention to temperature throughout the process ensures success.
Final Thoughts
Bakery-Style Chocolate Truffle Cake at Home delivers everything people love about professional chocolate cakes without requiring special equipment. The moist chocolate layers, thick truffle filling, and glossy ganache coating come together in a way that feels indulgent and satisfying. Each step builds flavor and texture carefully, resulting in a cake that looks impressive and tastes even better.
Taking your time with cooling, layering, and ganache pouring makes all the difference. Once you slice into it and see those smooth layers, you will feel proud of what you created. Sharing it with family or friends turns an ordinary day into a celebration centered around chocolate.