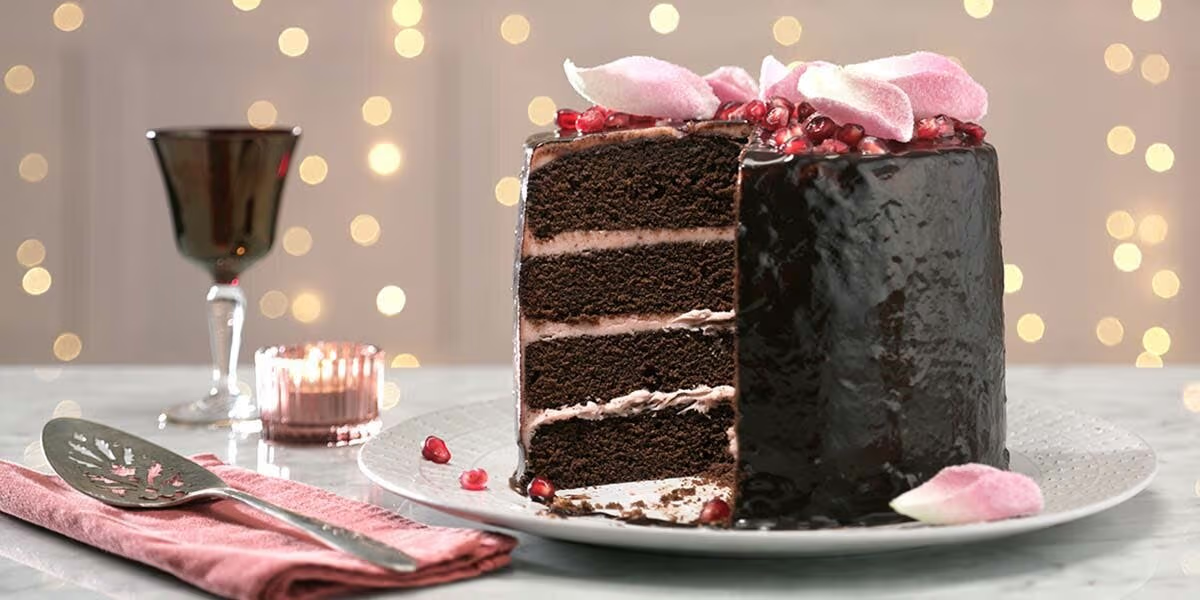
Moist Dark Chocolate Cake with Espresso Glaze
Rich chocolate flavor, a tender crumb, and a glossy espresso glaze that drips down each slice make this cake one of my most requested recipes. I rely on it for birthdays, small gatherings, and those evenings when only deep, dark chocolate will do. The texture stays soft for days, and the espresso glaze adds just enough bitterness to balance the sweetness without overpowering the cake itself.
I designed this moist dark chocolate cake with espresso glaze to be simple enough for a home baker yet impressive enough to serve to guests. You will not need any complicated techniques or specialty equipment beyond basic baking tools. If you follow the steps carefully, you can move from mixing bowl to beautifully glazed cake with complete confidence.
Why This Cake Turns Out So Moist
Moisture in a dark chocolate cake depends on the balance between fat, sugar, and liquid. In this recipe, I combine oil and buttermilk to create a soft, plush crumb that does not dry out quickly. Oil provides consistent tenderness, while buttermilk adds both moisture and a subtle tang that enhances the chocolate flavor.
Hot coffee is another key element. It does not make the cake taste like coffee, but it intensifies the cocoa and deepens the overall profile. When hot liquid meets cocoa powder, it blooms the chocolate flavor and creates a smoother batter that bakes evenly.
Brown sugar also contributes to moisture retention. Its molasses content locks in softness and gives the cake a slightly caramel-like undertone. Together, these ingredients ensure that every slice stays rich and tender rather than crumbly or dry.
Ingredients for The Dark Chocolate Cake
I always measure ingredients accurately, especially in baking. Using a kitchen scale is ideal, but standard measuring cups work as long as you level them properly.
For the cake layers, you will need:
2 cups all-purpose flour
3/4 cup unsweetened dark cocoa powder
2 cups granulated sugar
1/2 cup brown sugar
2 teaspoons baking soda
1 teaspoon baking powder
1 teaspoon fine salt
3 large eggs at room temperature
1 cup buttermilk at room temperature
1/2 cup neutral oil such as sunflower or canola
1 tablespoon pure vanilla extract
1 cup hot freshly brewed coffee
1/2 cup hot water
These quantities yield two 9-inch round cake layers. If you prefer a taller cake, you can bake the batter in three 8-inch pans and adjust the baking time slightly.
Ingredients for The Espresso Glaze
The glaze should be smooth, pourable, and glossy. It sets softly on the cake, creating a thin layer that enhances flavor without forming a hard shell.
You will need:
1 cup heavy cream
1 1/4 cups dark chocolate, finely chopped
1 tablespoon unsalted butter
1 to 2 teaspoons espresso powder
1 tablespoon light corn syrup or honey
The espresso powder intensifies the chocolate and gives the glaze a subtle coffee aroma. If you enjoy a stronger coffee note, use the full two teaspoons. For a gentler flavor, start with one teaspoon and taste before adding more.
Preparing The Cake Pans
I begin by preheating the oven to 175°C or 350°F. Proper oven temperature is crucial, so I always let it fully preheat before placing the cakes inside. Meanwhile, I grease two 9-inch round cake pans with butter or oil and line the bottoms with parchment paper.
After lining, I lightly dust the pans with cocoa powder instead of flour. This prevents white residue from appearing on the dark cake edges. A quick tap removes excess cocoa and ensures the layers release easily after baking.
Mixing The Dry Ingredients
In a large bowl, I sift together the flour, cocoa powder, baking soda, baking powder, and salt. Sifting removes lumps from the cocoa and distributes the leavening agents evenly. Even distribution prevents uneven rising or dense pockets in the finished cake.
Once sifted, I whisk in both the granulated sugar and brown sugar. Combining them thoroughly at this stage ensures that sweetness spreads evenly throughout the batter.
Combining The Wet Ingredients
In a separate bowl, I whisk the eggs until slightly frothy. This introduces a bit of air and helps the cake rise properly. Then I add the buttermilk, oil, and vanilla extract, whisking until the mixture becomes smooth and cohesive.
The wet ingredients should be at room temperature. Cold ingredients can cause the batter to stiffen or bake unevenly. Allowing them to sit out for about 30 minutes before baking usually solves this issue.
Bringing The Batter Together
I pour the wet mixture into the bowl of dry ingredients and begin mixing gently. A spatula or whisk works well, but I avoid overmixing. Overworking the batter can develop too much gluten, leading to a tougher texture.
Once partially combined, I slowly add the hot coffee and hot water. The batter will appear thin, but that is exactly how it should look. A thinner batter helps create a moist, delicate crumb after baking.
I stir just until everything is incorporated and no large streaks of flour remain. The batter should be smooth and glossy, with a deep chocolate color.
Baking The Cake Layers
I divide the batter evenly between the prepared pans. Using a kitchen scale helps ensure uniform layers, but eyeballing works if you are careful. I gently tap the pans on the counter to release any trapped air bubbles.
The cakes bake in the center rack of the oven for about 30 to 35 minutes. I begin checking at the 30-minute mark by inserting a toothpick into the center. If it comes out with a few moist crumbs but no wet batter, the cake is done.
After removing the pans from the oven, I let them cool for 10 to 15 minutes before turning them out onto a wire rack. Peeling off the parchment paper while the cake is still slightly warm prevents sticking. The layers must cool completely before glazing.
Making The Espresso Glaze
While the cake cools, I prepare the espresso glaze. In a small saucepan, I heat the heavy cream over medium heat until it begins to steam and just barely simmer. I do not let it boil, as that can affect the texture of the glaze.
I pour the hot cream over the finely chopped dark chocolate in a heatproof bowl. After letting it sit undisturbed for about two minutes, I stir gently from the center outward. The chocolate melts gradually, forming a smooth ganache.
Next, I add the butter, espresso powder, and corn syrup. The butter adds shine and silkiness, while the corn syrup enhances gloss. I stir until everything is fully incorporated and the glaze looks smooth and luxurious.
Adjusting The Glaze Consistency
If the glaze feels too thick, I add a tablespoon of warm cream to loosen it. If it seems too thin, I allow it to cool slightly at room temperature until it thickens naturally. The ideal consistency should be pourable but not watery.
I like to let the glaze cool for about 10 to 15 minutes before pouring it over the cake. This helps control the drip effect and prevents it from sliding off too quickly.
Assembling The Cake
Once the cake layers are completely cool, I place one layer on a serving plate or cake stand. If the tops have domed slightly, I trim them with a serrated knife for a flat surface. This step ensures stability and a professional finish.
I spread a thin layer of glaze or chocolate frosting between the layers if I want extra richness. Then I place the second layer on top, aligning it carefully.
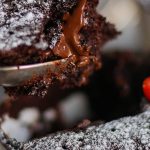
To glaze, I pour the espresso glaze slowly over the center of the cake. Using an offset spatula, I gently guide it toward the edges, allowing it to drip naturally down the sides. I avoid overworking the glaze so it retains a smooth finish.
Setting And Serving
The glaze sets at room temperature within about 30 to 45 minutes. If I am in a hurry, I refrigerate the cake for 15 minutes to speed up the process. Once set, the surface becomes glossy yet soft enough to slice cleanly.
I use a sharp knife dipped in hot water and wiped dry before each cut. This technique creates neat slices and prevents the glaze from dragging. Each slice reveals a dark, moist crumb contrasted by the shiny espresso topping.
Storage Tips
This moist dark chocolate cake with espresso glaze stays fresh at room temperature for up to three days. I cover it loosely with a cake dome or store it in an airtight container. Refrigeration is optional, but it can firm up the glaze slightly.
If refrigerated, I let the cake sit at room temperature for about 30 minutes before serving. This allows the texture to soften and the chocolate flavors to shine again.
For longer storage, the unglazed cake layers freeze beautifully. I wrap them tightly in plastic wrap and then in foil before freezing for up to two months. Thaw them at room temperature before glazing.
Flavor Variations
Although I love the balance of dark chocolate and espresso, you can customize this recipe easily. Adding a teaspoon of orange zest to the batter creates a subtle citrus note that pairs beautifully with chocolate. A splash of coffee liqueur in the glaze adds extra depth for adult gatherings.
You can also sprinkle flaky sea salt on top of the glaze just before it sets. The salt enhances the sweetness and highlights the espresso undertones without overpowering the cake.
Troubleshooting Common Issues
If the cake sinks in the middle, the oven door may have been opened too early or the batter may have been underbaked. Allowing the cake to bake fully and avoiding sudden temperature changes prevents this issue.
If the cake feels dry, it may have baked too long or the flour measurement was too heavy. Measuring accurately and checking for doneness early helps maintain the intended moist texture.
If the glaze separates or looks oily, the cream may have been too hot. Gentle heating and slow stirring keep the emulsion stable and silky.
Final Thoughts
Moist dark chocolate cake with espresso glaze delivers bold flavor and a soft, tender crumb without complicated techniques. Each step builds toward a dessert that feels indulgent yet completely achievable at home. From blooming cocoa with hot coffee to pouring the glossy glaze over cooled layers, every detail plays a role in the final result.
I return to this recipe repeatedly because it never disappoints. The balance between deep chocolate richness and subtle espresso bitterness creates a cake that feels elegant yet comforting. Once you bake it and see how beautifully it slices, it will likely earn a permanent place in your collection as well.