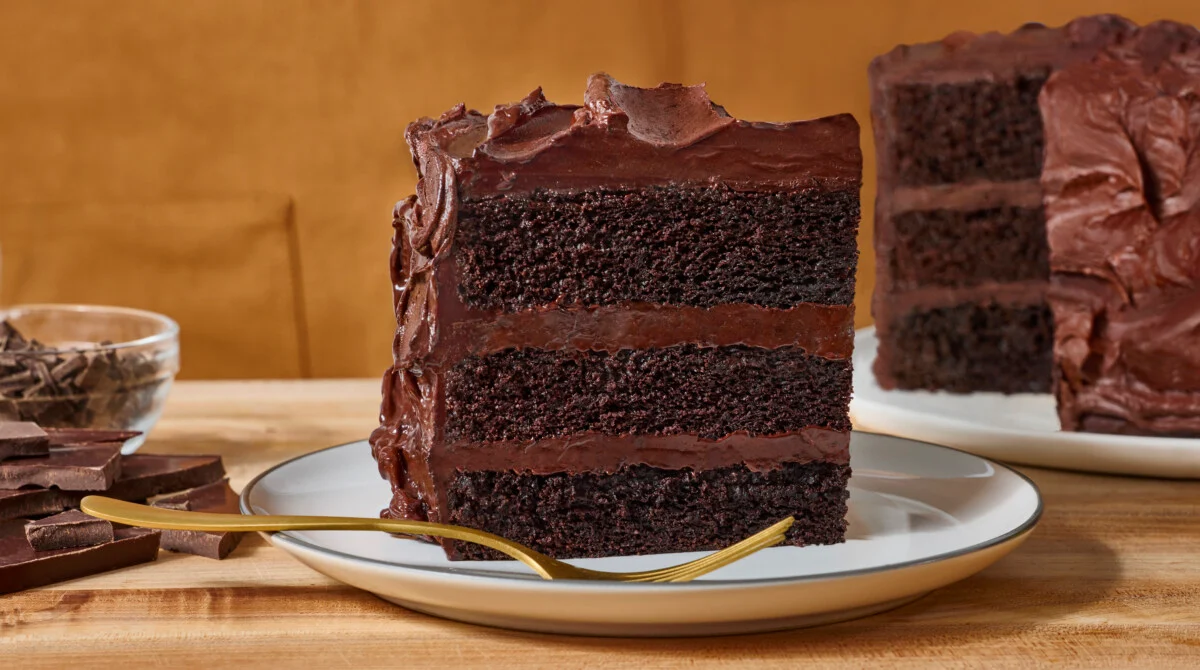
Triple Chocolate Layer Cake for Serious Chocoholics
Chocolate should be bold, unapologetic, and layered in more than one way when I am baking for true chocoholics. This triple chocolate layer cake delivers depth from three distinct sources: rich cocoa in the sponge, melted dark chocolate folded into the batter, and a luscious combination of milk and dark chocolate in the frosting and filling. Each bite is dense yet soft, intensely flavorful yet balanced, and satisfying without being overwhelmingly sweet.
I designed this recipe for people who believe chocolate cake should taste unmistakably like chocolate, not just sweet brown sponge. The structure is sturdy enough to hold generous layers of frosting, yet tender enough to melt gently on the tongue. If you follow the measurements and steps exactly as written, you will end up with a bakery-quality triple chocolate layer cake right from your own kitchen.
Ingredients Measured With Precision
This recipe makes three 8-inch round cake layers.
For The Chocolate Cake Layers:
- 2 cups (250 g) all-purpose flour
- ¾ cup (75 g) high-quality unsweetened cocoa powder
- 2 teaspoons baking soda
- 1 teaspoon baking powder
- ½ teaspoon fine salt
- 1 cup (225 g) unsalted butter, melted and slightly cooled
- 1½ cups (300 g) granulated sugar
- ½ cup (100 g) light brown sugar, packed
- 4 large eggs, room temperature
- 2 teaspoons pure vanilla extract
- 150 g dark chocolate (60–70%), melted and cooled slightly
- 1 cup (240 ml) whole milk, room temperature
- ¾ cup (180 ml) hot brewed coffee
For The Dark Chocolate Ganache Filling:
- 200 g dark chocolate (60–70%), finely chopped
- ¾ cup (180 ml) heavy cream
For The Milk Chocolate Buttercream Frosting:
- 1 cup (225 g) unsalted butter, softened
- 300 g milk chocolate, melted and cooled
- 3 cups (360 g) powdered sugar, sifted
- 2–3 tablespoons heavy cream
- 1 teaspoon vanilla extract
- Pinch of salt
Using a digital scale guarantees consistent results, especially with flour and cocoa powder. Chocolate cakes are sensitive to small measurement errors, and precision is what creates that perfect moist crumb. Room temperature ingredients blend more smoothly and prevent the batter from curdling or overmixing.
Preparing The Pans And Oven
I start by preheating my oven to 175°C (350°F). A properly heated oven ensures even rising and prevents dense centers. I always allow at least 15 minutes for the oven to reach full temperature before placing the cakes inside.
Next, I grease three 8-inch round cake pans with butter and line the bottoms with parchment paper circles. After placing the parchment, I lightly grease again and dust the pans with cocoa powder instead of flour. This step prevents sticking and keeps the cake edges beautifully dark without a pale residue.
Preparing the pans thoroughly gives me peace of mind. Removing delicate chocolate layers from pans can be tricky, and this simple preparation eliminates that risk.
Mixing The Dry Ingredients
In a large bowl, I sift together the flour, cocoa powder, baking soda, baking powder, and salt. Sifting breaks up cocoa clumps and aerates the flour, which helps create a lighter crumb. Even distribution of leavening agents ensures the layers rise evenly without doming excessively.
After sifting, I whisk the mixture thoroughly. This step might seem minor, but it prevents pockets of baking soda or powder that can create uneven texture. Once combined, I set the bowl aside while preparing the wet ingredients.
Building The Chocolate Batter
In another large bowl, I whisk together the melted butter, granulated sugar, and brown sugar until glossy and smooth. The brown sugar adds moisture and subtle caramel undertones, which enhance the overall chocolate flavor. This mixture should look thick and cohesive before adding eggs.
I add the eggs one at a time, whisking well after each addition. Incorporating them gradually creates structure and helps the batter emulsify properly. After the eggs are blended in, I stir in the vanilla extract and melted dark chocolate.
The melted dark chocolate deepens the flavor and adds richness that cocoa powder alone cannot achieve. I make sure it is slightly cooled before mixing it in so it does not scramble the eggs. The batter will become darker and silkier at this stage.
Combining Wet And Dry Components
I add half of the dry ingredients to the chocolate mixture and gently fold it in with a spatula. Folding instead of aggressively stirring prevents overdevelopment of gluten, which would make the cake tough. Once partially combined, I pour in the milk and mix gently until incorporated.
Next, I fold in the remaining dry ingredients just until no streaks of flour remain. The batter will be thick at this point, but that changes quickly. I slowly pour in the hot coffee while stirring gently, and the batter loosens into a smooth, pourable consistency.
The coffee intensifies the chocolate flavor without leaving a coffee taste. It enhances the cocoa’s depth and creates a darker, more complex result. The batter should be smooth and glossy, with no lumps.
Baking The Cake Layers
I divide the batter evenly among the three prepared pans, using a scale if necessary to ensure equal layers. Even layers bake uniformly and stack neatly. I gently tap each pan on the counter to release trapped air bubbles.
The cakes bake for 25 to 30 minutes. I begin checking at the 25-minute mark by inserting a toothpick into the center of each layer. The toothpick should come out with a few moist crumbs but no wet batter.
Once baked, I allow the cakes to cool in the pans for 10 minutes before turning them out onto wire racks. They must cool completely before filling and frosting, otherwise the buttercream will melt and lose structure.
Preparing The Dark Chocolate Ganache Filling
While the cake layers cool, I prepare the ganache filling. I place the chopped dark chocolate in a heatproof bowl. In a saucepan, I heat the heavy cream just until it begins to simmer along the edges.
I pour the hot cream over the chocolate and let it sit undisturbed for five minutes. This resting period allows the chocolate to melt evenly. Afterward, I stir gently from the center outward until the mixture becomes smooth and glossy.
I allow the ganache to cool at room temperature until it thickens to a spreadable consistency. It should resemble a soft pudding texture, not runny but not stiff. This ganache adds an intense, bittersweet layer between the cakes.
Making The Milk Chocolate Buttercream
In a large bowl, I beat the softened butter with an electric mixer until pale and creamy. This step incorporates air and creates a light base for the frosting. The butter should look fluffy before adding any sugar.
I gradually add the sifted powdered sugar, mixing on low speed to prevent a sugar cloud. Once incorporated, I pour in the melted and cooled milk chocolate, vanilla extract, and a pinch of salt. The mixture becomes smooth and rich as the chocolate blends in.
If the frosting feels too thick, I add heavy cream one tablespoon at a time until it reaches a soft, spreadable consistency. The final buttercream should hold its shape but spread easily without tearing the cake layers.
Assembling The Triple Chocolate Layer Cake
I place the first cake layer on a serving plate and spread a generous layer of dark chocolate ganache over the top. The ganache creates a bold chocolate punch that balances the sweetness of the buttercream. I make sure the layer is even and reaches close to the edges.
Next, I place the second cake layer on top and repeat the ganache filling. After positioning the final layer, I apply a thin crumb coat of milk chocolate buttercream over the entire cake. This initial layer traps loose crumbs and creates a smooth foundation.
I refrigerate the cake for 20 to 30 minutes to set the crumb coat. Once chilled, I apply a thicker layer of buttercream over the top and sides, smoothing it with an offset spatula. For extra indulgence, I sometimes drizzle additional ganache over the top and allow it to drip slightly down the sides.
Finishing Touches And Presentation
For serious chocoholics, I often decorate the top with chocolate shavings, curls, or small chunks of dark and milk chocolate. The visual contrast between textures makes the cake even more inviting. A light dusting of cocoa powder also adds elegance.
I slice the cake using a sharp knife warmed under hot water and wiped dry. Clean cuts reveal the distinct layers of sponge, ganache, and buttercream. The combination of three chocolate elements creates a stunning cross-section.
Allowing the cake to sit at room temperature for about 30 minutes before serving ensures the buttercream softens slightly. This enhances the melt-in-your-mouth texture and intensifies the flavor.
Storage And Serving Tips
I store this cake in an airtight container at room temperature for up to three days. If refrigerated, I allow it to come back to room temperature before serving to maintain its soft texture. Cold buttercream can feel firm and less creamy.
The flavor deepens after a day as the layers settle and the chocolate components meld together. Many people tell me it tastes even better the next day. Pairing a slice with black coffee or cold milk balances the richness beautifully.
Final Thoughts
This triple chocolate layer cake is unapologetically rich and designed for those who crave chocolate in its fullest expression. The cocoa sponge, dark chocolate ganache, and milk chocolate buttercream each play a distinct role while blending into one harmonious dessert. Careful measurement, proper mixing, and attentive baking make all the difference in achieving that perfect texture.
If you follow each step with patience and precision, you will create a cake that feels indulgent yet refined. It is the kind of dessert that silences a room when sliced and brings smiles with the first bite. For serious chocoholics, this recipe delivers exactly what its name promises: triple the chocolate, triple the satisfaction, and a cake worth making again and again.