
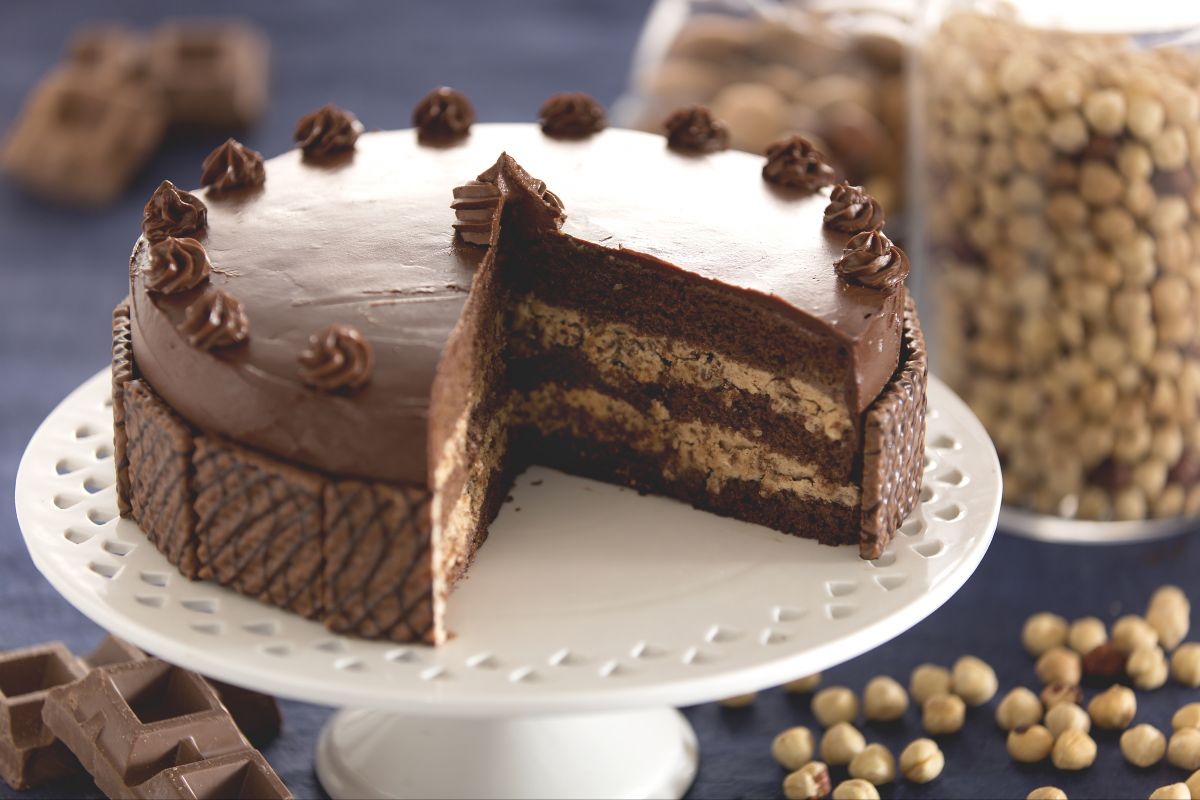
Chocolate Hazelnut Cream Cake brings together deep cocoa flavor, toasted hazelnuts, and a silky cream filling that makes each slice feel luxurious. The combination of chocolate and hazelnut has always felt timeless to me, rich without being overwhelming and elegant without being fussy. This cake is layered, filled, and finished in a way that looks impressive, yet the steps are clear and manageable for any home baker willing to follow along carefully.
I rely on a moist chocolate sponge as the base, enriched with cocoa powder and just enough fat to keep it tender. Between the layers, I spread a smooth hazelnut cream that blends mascarpone, chocolate hazelnut spread, and whipped cream. The outside is finished with a glossy chocolate ganache and a scattering of toasted hazelnuts for texture and visual appeal.
The beauty of this recipe lies in balance. The sponge is soft but sturdy, the filling is creamy yet stable, and the ganache adds a final layer of indulgence. By the time the cake is chilled and sliced, the flavors meld together into something that tastes as good as it looks.
Ingredients For The Chocolate Sponge
For two 8-inch round cake layers, gather the following ingredients:
- 200 grams (1 2/3 cups) all-purpose flour
- 75 grams (3/4 cup) unsweetened cocoa powder
- 2 teaspoons baking powder
- 1/2 teaspoon baking soda
- 1/2 teaspoon salt
- 250 grams (1 1/4 cups) granulated sugar
- 100 grams (1/2 cup) light brown sugar
- 3 large eggs, room temperature
- 120 ml (1/2 cup) vegetable oil
- 180 ml (3/4 cup) whole milk, room temperature
- 120 ml (1/2 cup) hot brewed coffee
- 2 teaspoons vanilla extract
The hot coffee enhances the chocolate flavor without making the cake taste like coffee. If you prefer not to use coffee, hot water works as a substitute, though I find coffee gives deeper flavor.
Room temperature eggs and milk blend more smoothly into the batter. Measuring accurately and leveling dry ingredients ensures a consistent texture in the finished cake.
Ingredients For The Hazelnut Cream Filling
For the filling, you will need:
- 250 grams (1 cup) mascarpone cheese, chilled
- 240 grams (1 cup) chocolate hazelnut spread
- 240 ml (1 cup) heavy whipping cream, cold
- 2 tablespoons powdered sugar
- 1 teaspoon vanilla extract
- 60 grams (1/2 cup) finely chopped toasted hazelnuts
The mascarpone provides structure and a slight tang that balances the sweetness of the hazelnut spread. The whipped cream lightens the filling, making it airy and smooth rather than dense.
To toast the hazelnuts, I spread them on a baking sheet and bake at 175°C (350°F) for about 8 to 10 minutes until fragrant. Once cooled slightly, I rub them in a clean kitchen towel to remove most of the skins, then chop them finely.
Ingredients For The Chocolate Ganache Topping
For the ganache, gather:
- 200 grams dark chocolate, finely chopped
- 200 ml (3/4 cup plus 1 tablespoon) heavy cream
- 1 tablespoon unsalted butter
The butter adds shine and smoothness to the ganache. Finely chopping the chocolate helps it melt evenly once the hot cream is poured over.
This quantity creates a thick yet pourable ganache that drapes beautifully over the cake. If you prefer a thinner drip effect, you can slightly increase the cream by one or two tablespoons.
Preparing The Cake Pans
I begin by preheating the oven to 175°C (350°F). I grease two 8-inch round cake pans and line the bottoms with parchment paper.
Lightly dusting the sides with cocoa powder instead of flour prevents white streaks on the dark cake surface. I tap out any excess before setting the pans aside.
Preparing the pans before mixing ensures the batter can go straight into the oven once ready. This helps maintain the proper rise and texture.
Mixing The Dry Ingredients
In a large bowl, I sift together the flour, cocoa powder, baking powder, baking soda, and salt. Sifting removes lumps from the cocoa and aerates the mixture.
I whisk everything briefly to ensure even distribution. The cocoa should be fully incorporated into the flour mixture.
This step prevents uneven pockets of dry ingredients in the final cake. Once combined, I keep the bowl nearby for easy access.
Mixing The Wet Ingredients
In a separate large mixing bowl, I combine the granulated sugar, brown sugar, and eggs. I whisk until the mixture looks slightly lighter and well blended.
I add the vegetable oil, milk, and vanilla extract, whisking until smooth. The batter will appear fluid at this stage.
Slowly, I pour in the hot coffee while whisking gently. The heat helps bloom the cocoa and intensify the chocolate flavor.
Combining Wet And Dry Components
I gradually add the dry ingredients into the wet mixture in two additions. I stir gently with a spatula until just combined.
The batter will be relatively thin, which is expected for a moist chocolate cake. I make sure no streaks of flour remain at the bottom of the bowl.
Overmixing can toughen the cake, so I stop as soon as everything is incorporated. The batter should look smooth and glossy.
Baking The Chocolate Layers
I divide the batter evenly between the prepared pans. To ensure even layers, I weigh the pans if possible.
The cakes bake in the preheated oven for 30 to 35 minutes. I begin checking at 30 minutes by inserting a toothpick into the center.
The toothpick should come out with a few moist crumbs but no wet batter. Once baked, I allow the cakes to cool in their pans for 10 minutes before turning them out onto a wire rack.
Preparing The Hazelnut Cream Filling
While the cakes cool completely, I prepare the filling. In a chilled bowl, I beat the heavy cream with powdered sugar until soft peaks form.
In another bowl, I mix the mascarpone with the chocolate hazelnut spread and vanilla extract until smooth. I avoid overmixing to prevent the mascarpone from becoming grainy.
I gently fold the whipped cream into the mascarpone mixture in two additions. Once combined, I fold in the chopped toasted hazelnuts for added texture.
Assembling The Cake
Once the cake layers are fully cooled, I level them if needed using a serrated knife. A flat surface ensures stable stacking.
I place one layer on a serving plate and spread a generous portion of the hazelnut cream filling evenly over the top. I keep the filling about half an inch from the edge to prevent overflow.
The second cake layer goes on top, pressed down gently to secure it. I spread a thin layer of filling around the sides as a crumb coat and refrigerate the cake for 20 to 30 minutes to set.
Preparing The Ganache
To make the ganache, I heat the heavy cream in a small saucepan until it just begins to simmer. I do not let it boil.
I pour the hot cream over the finely chopped dark chocolate in a heatproof bowl. I let it sit undisturbed for two to three minutes.
I stir gently from the center outward until smooth and glossy. I add the butter and stir until fully incorporated.
Finishing The Cake
I allow the ganache to cool slightly until it thickens but remains pourable. Then I pour it over the chilled cake, starting in the center and working outward.
Using an offset spatula, I guide the ganache toward the edges, allowing some to drip naturally down the sides. The chilled crumb coat helps control the drips.
For decoration, I sprinkle additional chopped toasted hazelnuts around the edges or create a ring along the top border. The contrast between glossy chocolate and golden hazelnuts makes the cake visually striking.
Chilling And Setting
After finishing the ganache, I refrigerate the cake for at least one hour. This allows the filling and ganache to firm up properly.
Before serving, I remove the cake from the refrigerator about 20 minutes in advance. This short rest softens the filling slightly and enhances the flavors.
Slicing with a warm knife creates clean, professional-looking cuts. I wipe the blade between slices for the neatest presentation.
Texture And Flavor Profile
The chocolate sponge is moist and tender with a deep cocoa flavor enhanced by the coffee. The hazelnut cream filling is smooth, nutty, and lightly sweetened.
The toasted hazelnuts add a gentle crunch that contrasts beautifully with the soft cake and creamy filling. The ganache provides a rich, slightly bittersweet finish.
Each bite delivers layers of flavor that complement rather than overpower one another. The balance between sweetness, nuttiness, and chocolate intensity makes this cake memorable.
Storage And Serving Tips
I store the cake covered in the refrigerator for up to three days. The mascarpone filling requires refrigeration to remain stable and fresh.
For best texture, I let slices sit at room temperature briefly before serving. The cream softens slightly, and the flavors become more pronounced.
This cake also works well for celebrations. It can be made a day in advance, allowing the flavors to meld and deepen overnight.
Final Thoughts
Chocolate Hazelnut Cream Cake combines moist chocolate layers, airy hazelnut cream, and silky ganache into a dessert that feels refined yet approachable. The step-by-step process ensures clarity, allowing anyone to recreate it successfully at home.
By carefully measuring, mixing gently, and allowing proper chilling time, you can achieve a cake that slices beautifully and tastes even better. The contrast of textures and the harmony of chocolate and hazelnut make this recipe one I return to often.
With patience and attention to detail, this Chocolate Hazelnut Cream Cake becomes more than just a dessert. It turns into a centerpiece that brings richness, warmth, and a sense of occasion to any table.